The Mindgasm Session Builder
Navigation
1. Session Builder Tutorial Video
2. Introduction

While the Mindgasm app has a lot of individual tracks and ready-to-use playlists for your Mindgasm practice, you will ultimately want to enjoy the flexibility of creating your own sessions as you progress in your journey.
A session is usually what we call the time when you practise Mindgasm. In this technical context, it is mostly synonymous with ‘playlist’: a list of individual tracks to be used in sequence for one occasion.
A track is typically a set of three audio files: voice-over guidance with the female voice Allie, voice-over with the male voice Paul, plus an instrumental-only version (e. g. the lessons). A track entry in a playlist selects one particular file of this set.
Sometimes only an instrumental version is available (e. g. most of the rides), sometimes only voice-over files (e. g. challenge intros), and in exceptional cases, only one of the voices, with or without an accompanying instrumental version, or even several voices in the same file (a few challenge intros). Lesson 4 and Top exercises have a set of five because of male-/female-specific voice guidance files both with Allie and Paul.
Three ways to create a session
- by setting up your own playlist from scratch,
- by creating a copy of an existing playlist and modifying it to your needs,
- by importing (and potentially modifying) a public playlist that another community member shared with you.
3. Duplicate an existing playlist
- In the mobile apps, a click on the cover picture or the title below the image opens the playlist.
- In the web app, click on the title below the image to open the playlist view. A click on the image will play the playlist directly — if it’s your own session under My Playlists, it will let you choose between playing and opening the session builder.
On the playlist view, there are normally two or three buttons next to the title on the right: Edit, Duplicate and Share.

You can see a tooltip bubble in the web app when you hover over these buttons with the mouse on a computer, or when you press and hold them in the mobile apps.
Edit is of course only available for your own playlists, but you can always make an editable, independent copy with the Duplicate button — if the original is changed, the copy is not updated.
What is different compared to the original?
- The session ID in the database (visible in the address bar of the browser in the web app).
- The title: ” (copy)” is appended — this can be changed.
- Access — the copy will be private by default, which can be changed too.
- Potentially, the owner — the copy now belongs to you in any case.
The image, track list and description will stay the same, but you can modify all of them as you like.
🖊️ Clicking on Edit (the pencil icon) will open the session builder. Now you can tailor the copied playlist to your needs. See below for details.
4. Import a shared playlist
- opening the session in the app, and then
- duplicating it as described above, in order to save an editable copy to your app profile.
https://app.mindgasm.net/session/<UUID>
A concrete example: https://app.mindgasm.net/session/245e7a1c-7e01-49ca-8bde-6eda951e748f
Now you have two options for opening the session:
2. With the app on your phone. Of course, you cannot navigate in the mobile app by pasting in a URL. What you need is a clickable session link, for example in the Discord app on your phone. Clicking the link should ideally open the Mindgasm app with the desired session. This depends on the settings for the Mindgasm app in your phone’s operating system. If you end up loading the web app in a browser, check the settings for opening supported links.

5. Create your own playlist
Open the session builder
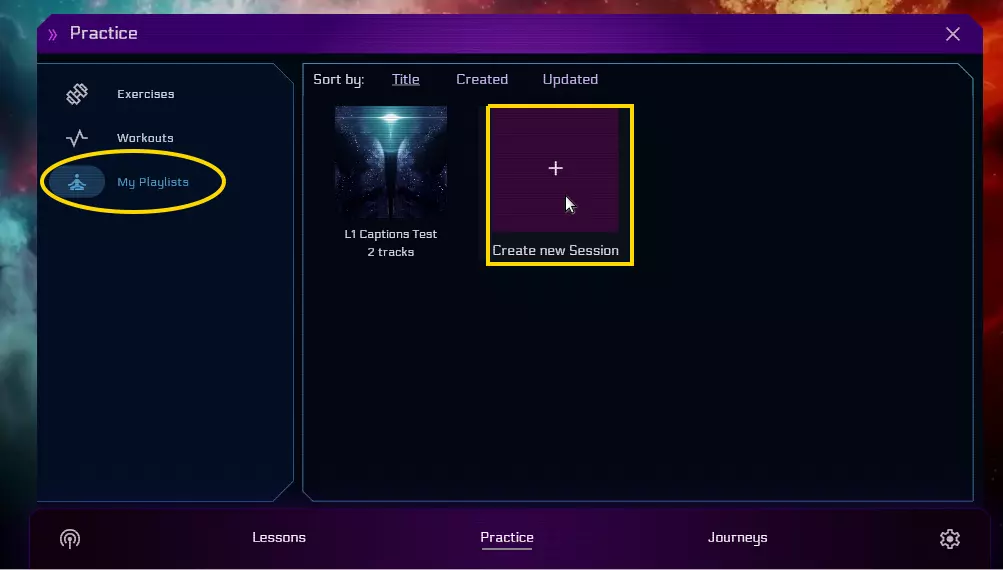
In the app, go to the “Practice” area, choose the “My Playlists” section, and find the “Create new Session” button at the very end of the list of your playlists. This will open the session builder with a new, empty session, ready to be filled with the details of your choosing.
Alternatively, you can start the session builder by opening an existing session under “My Playlists”, then click on Edit (the pencil icon).
Session builder start screen
In the screenshot above, showing the session builder start screen, session attributes that you can influence directly are marked in yellow (1 to 5). Green is used for session builder controls or displays (6 to 14).
➡️ On the session builder start screen, you can only manipulate the elements list (5). All other session details (1 – 4) can only be changed after a click on the “edit session” button (8).
The URL now looks like this:
https://app.mindgasm.net/session-builder/<UUID>
(“session-builder” instead of “session”).
➡️ Do not copy such a URL from the address bar in order to share a session with someone. (They would not be able to open the link — only the owner of a session can access it with the session builder.)
Always use the Share button for that. (In the screenshot, it is missing because the session is private. It will become visible next to the “edit session” button (8 in the screenshot) once you make it public.)
What can you do in the session builder?
- replace the default title “New Session” (1) with something more meaningful
- set/change a cover image (2)
- add/modify a description (3)
- change access (4): toggle between private and public, and share the session’s URL
- search/filter tracks (11) and add them to the list (5), reorder them, remove them
- add text blocks to the list, reorder them, remove them (5)
- temporarily hide the available tracks with the “X” at the top (10) or the double-arrows at the the bottom (10)
- leave the current session and go directly to a new one (12)
- play the tracks in the list with the corresponding button (13), the player will show up in the bottom right corner
- preview a track (click on it in the elements list, or on its cover)
- delete a session from your profile (see below)
- leave the session builder (14)
Session builder edit screen
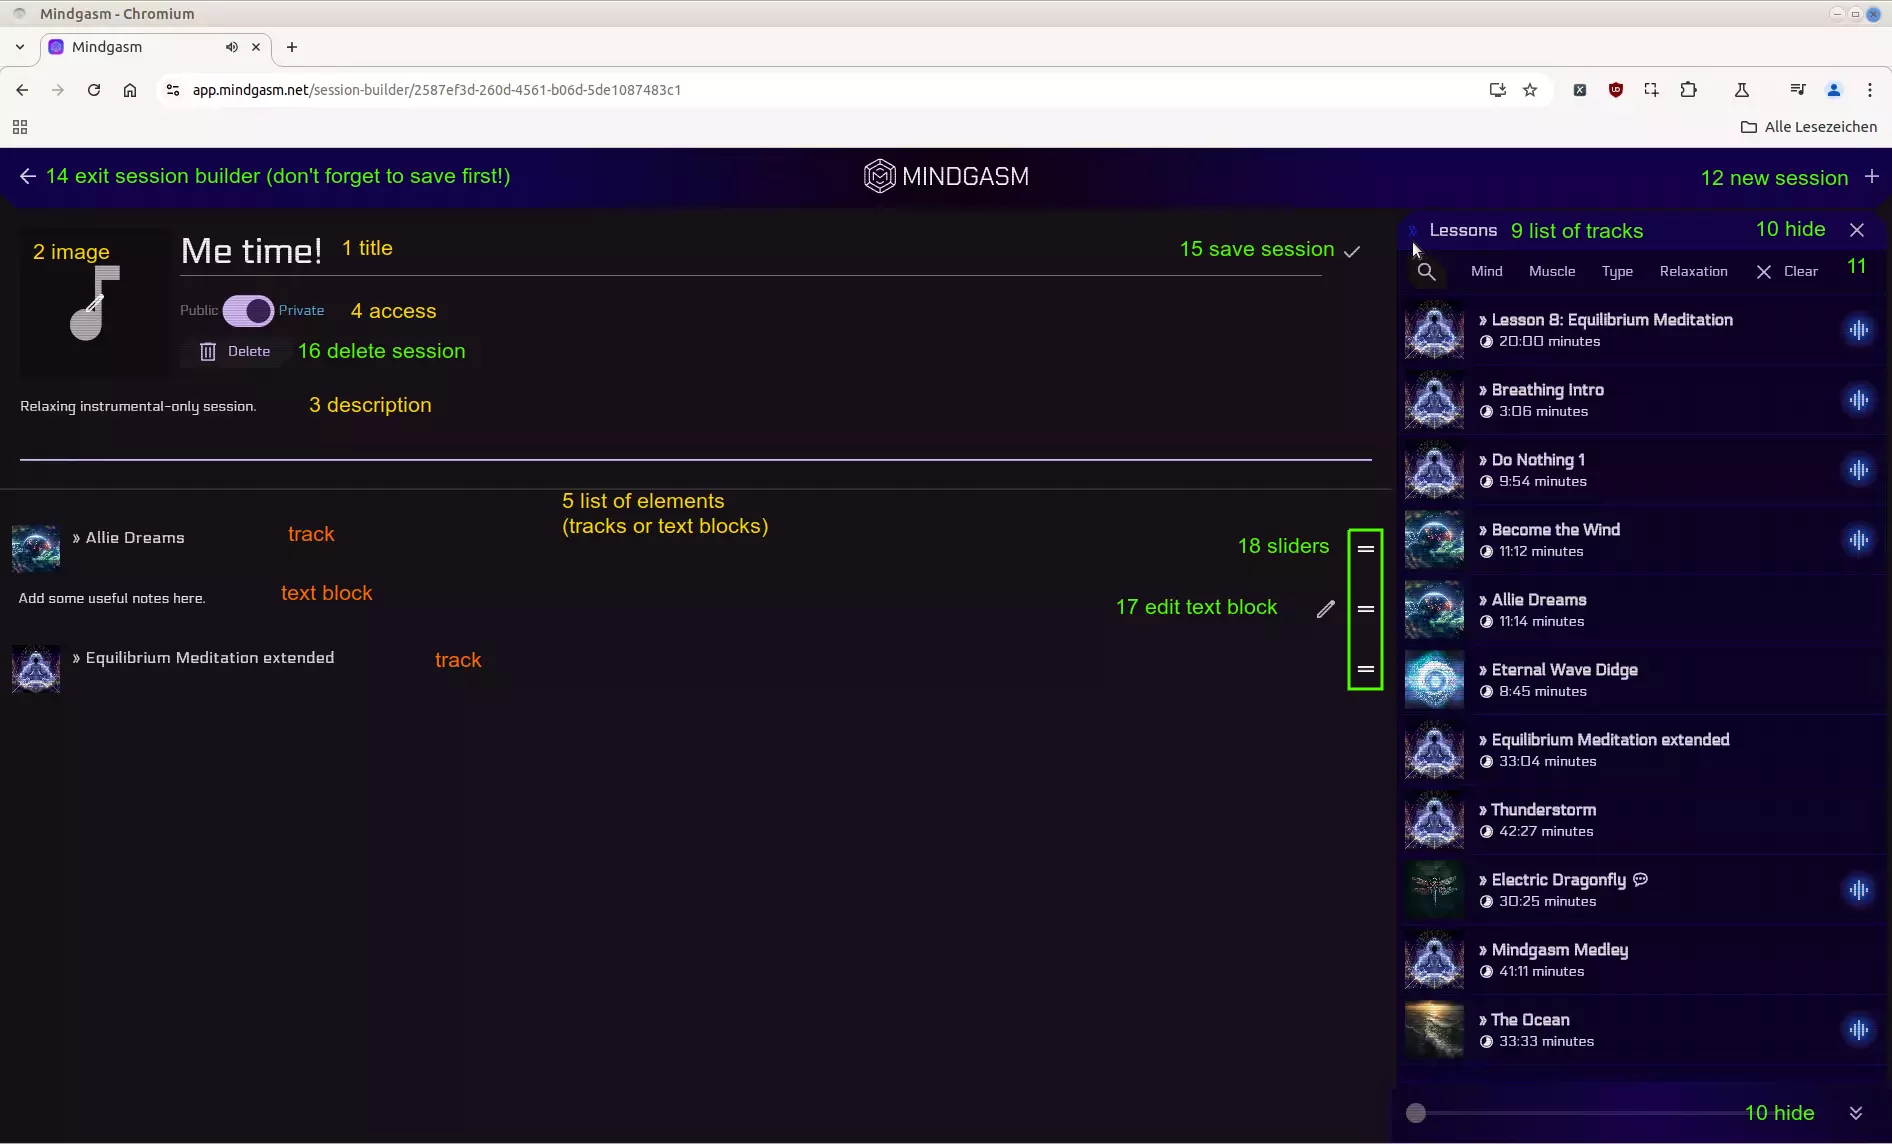
In the screenshot, showing the session builder edit screen, yellow is again for the information you can provide, green again for the controls, and the reddish just for explanation. The numbers are consistent with the previous image, 15 – 18 are new.
Note the little pencil over the placeholder image, indicating that you can change the session picture.
➡️ The save button (15) is only relevant for the upper part above the horizontal line. If you want to discard changes, simply exit the session builder (14).
However, if you have made changes to the elements list (5), such as changing the order with the sliders (18), these will be retained automatically — this includes auto-saving modified text blocks on exit! You can edit several blocks (17) at the same time. While you are editing, block-dependent save buttons will allow you to confirm your changes and leave the edit mode for the corresponding block.
Delete a session
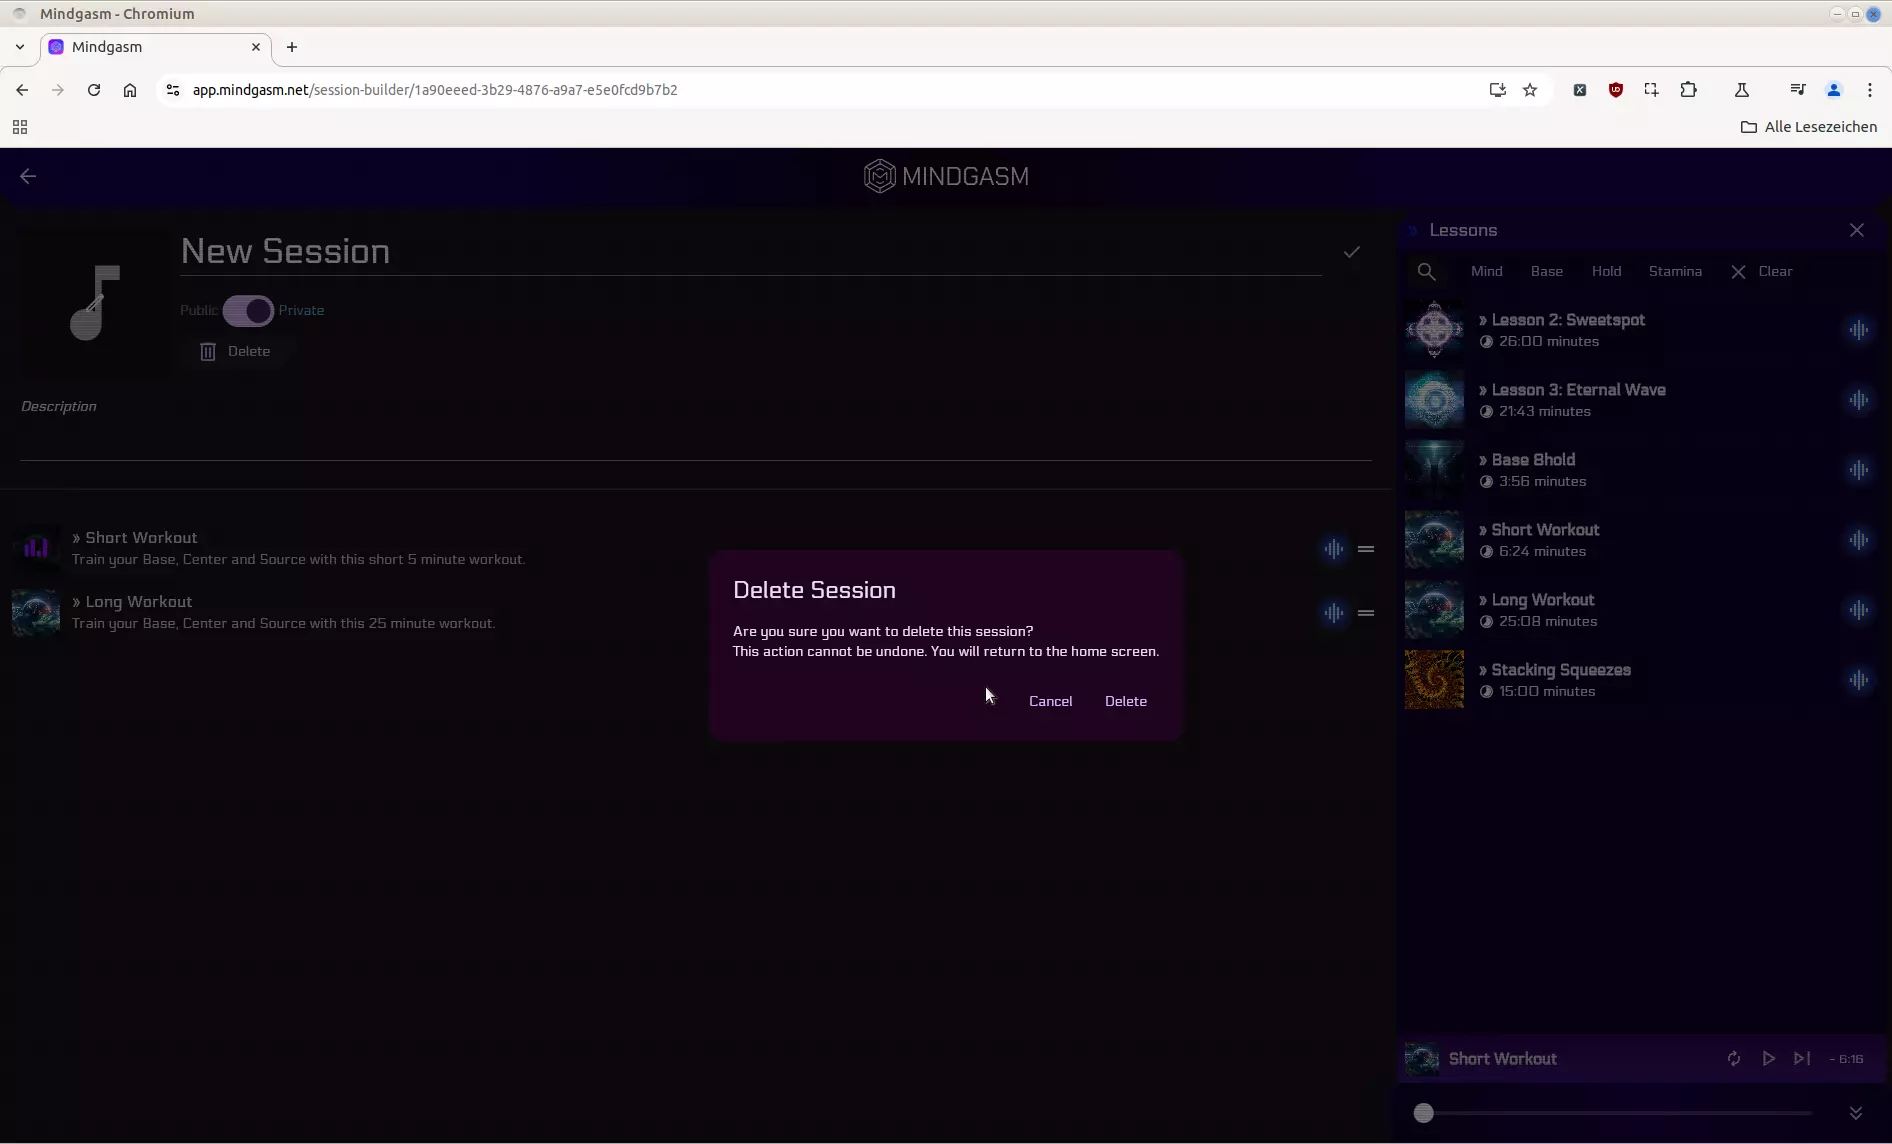
➡️ Clicking the “delete session” button (16) will open a confirmation pop-up window to prevent accidental data loss.
⚠️ A deleted session is gone forever, so be careful. (We may be able to recover it from a backup if you ask really nicely. 😉)
Find and add tracks
If you compare the list of available tracks (9) in the previous two screenshots (start screen vs. edit screen), you can see that the word “Goal” in the first has been replaced with the word “Relaxation” in the second, a configured filter yielding a completely different list of tracks, and there is an additional “X Clear” button to remove all filtering again.
Here is a more detailed view, showing the options for the “Goal” filters:
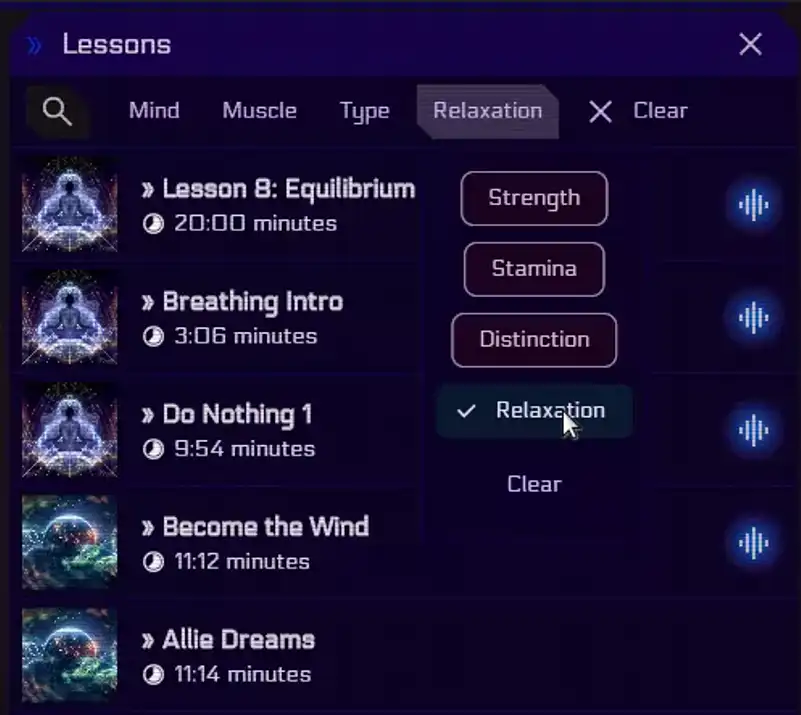
You can select and unselect individual filters, several filters in one group or more, and “Clear” filters for a whole group.
In the start screen screenshot, the default list contains every available track in the app — “lessons” in the section heading (9) as well as the background text for (5) is really to be understood in a very general sense here, meaning ‘track’. The list includes tracks in the following order:
- first, the lessons (in the specific sense, from the Lessons menu),
- then the exercises (from the Practice > Exercises menu),
- then the special challenge tracks (from the Journeys > 30 Day Challenge section),
- and finally the rides (from the Journeys > Rides menu).
Each track of these sets appears in the order of its corresponding menu. The available filters are the same as the ones in the Practice > Exercises menu, but there you can only choose from the exercise library of course.
➡️ Filters can be combined (with a logical AND), so the more filters you select, the more narrow your result list becomes. Of course, some combinations of filters will be too specific, or not meaningful, to return any results. Given that we have almost 300 tracks in the app, you will probably get the hang of using the filters soon — otherwise it’s a long list to scroll through. 🙂
➡️ Alternatively, using the search 🔍 (11) might be even faster to find the desired track(s):
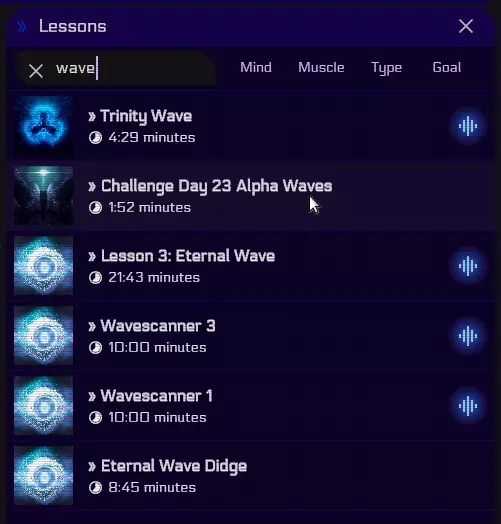
➡️ Once you have found the track you’re looking for, you can add it to the list (5) with a simple click. A blue icon next to the title indicates that you can toggle between voice-over (blue) and instrumental-only (grey). The toggle is usable both in the selection list on the right and the selected list on the left. (If it’s missing, the track is either music-only, like Eternal Wave Didge in the screenshot above, or voice-only, as the track from the challenge.) Repeat until you have all the desired tracks for your session.
➡️ Use the sliders (18) to adapt the order of the tracks, if necessary.
➡️ You can add tracks both on the start screen and the edit screen, but using the start screen has the advantage that the number of tracks is visible and updated on the fly. ⚠️ However, the duration is not! If you want to pay attention to the duration of the whole playlist, you need to leave the session builder to let the app calculate the overall duration, and then reopen the playlist. (Sorry for the inconvenience.)
➡️ You cannot create sessions that have a mixture of tracks with Allie and Paul since the narrator’s voice is configured in your profile for the whole app. In exceptional cases, it is however possible that both voices occur in a session: at the time of writing, this could happen if your profile is set to Allie and you include The Ocean (currently only available with Paul), or your profile is set to Paul and you include Orbit (only available with Allie).
Remove tracks
Removing a track (or text block, see below) is easy:
- In the mobile apps, swiping from left to right over a track will let it disappear from the track list.
- In the web app, use the same motion with the mouse (left-click, hold, move from left to right) to remove a track.

Include and remove notes
- In the phone apps, swipe from right to left over a track to add a text block above it (which can then be repositioned with a slider). Swiping from left to right over the text block will remove it, just like with tracks.
- In the web app, an A+ button will appear that will allow you to add a text block. Alternatively, swipe with the mouse from right to left; again, same procedure as with tracks.

Text blocks are versatile elements: they do not just allow for plain text, but also Markdown (which you might already be familiar with from Discord messages) or HTML syntax. This will let you format your notes and include hyperlinks. Pasting in a URL will make the link clickable without any further steps needed other than saving the block, but you can also use the square-brackets-followed-by-parentheses syntax [anchor text](address) for a better-looking clickable link.
➡️ Adding one or more text blocks is only possible as long as the playlist already contains at least one audio track! See the passage below about bookmarks for more details.
➡️ The description field supports Markdown too.

Permanent sessions
A permament session is a playlist intended for reuse. You want it to be useful and saved in your profile. It should have a meaningful, descriptive name, a realistic choice of tracks in a reasonable order, perhaps a helpful description and maybe even some text blocks with notes about techniques or things to remember for individual tracks. In terms of duration, it can be short or long. You might like to set up playlists for different purposes with varying lengths, to have something to choose from on a given day.
The options are limitless, there is no right or wrong. Experiment, and use the session builder to your advantage! 🙂
➡️ Your subscription has expired, and you have lost access to your playlists? No worries. We won’t delete your playlists from the database. Just renew your subscription, and access will be restored immediately.
Temporary sessions
Technically, there is no difference compared with permanent sessions. The only difference is that a temporary session is not intended for reuse, you plan to discard it immediately after a session. Of course, you could still play several tracks independently during a session. But would you really want to click around in the app during a session when you already know in advance which tracks you want? So whenever you plan to listen to more than one track, a playlist is the best option.
The app, however, tries hard to save your valuable work and creates a session in the database, in your profile, as soon as you open the session builder, so you will have to do some cleanup afterwards and delete the session manually.
For a temporary session, all you care about is the right tracks in the right order. So you would only fill out the list of elements (5) right before a session and hit play (session builder start screen). Things like title, description, image are irrelevant (no need to go to the session builder edit screen).
Another typical use case could be that you want to use a public playlist, e. g. from the 30-Day Challenge, but want to make a selection of all the suggested tracks (remove some to make the list shorter), or adapt the order of the tracks to your liking.
After the session, you would just click on Edit (8), then on Delete (16) and confirm. (That the delete button is a little hidden on the edit screen is a good thing to prevent accidental data loss.) All without ever having left the session builder, and this ad-hoc playlist will never appear under “My playlists”.
⚠️ Do remember that playlist duration is only updated when leaving the session builder, see above!
You still have the freedom to change your mind and keep the playlist for later, and make further changes.
6. Share a playlist
We have mentioned “public” and “private” already, the latter being the default for a new session. As the names suggest, a private session is accessible for its owner only, while a public session is intended to be shared. Sharing works by using the corresponding button (see above), copying the session URL to the clipboard (you will see a confirmation message it’s copied), and sending it to someone.
➡️ You could share a link for a private session (with the https://app.mindgasm.net/session/<UUID> format containing the session’s ID, e. g. by copying the URL from the opened session from the browser bar in the [web app](https://app.mindgasm.net), but it wouldn’t be accessible by someone else. So you need to make it public explicitly if you want to share a session. This can be done on the edit screen discussed above.
7. Track progress in the app
It has often been requested that the app should remember the last played lesson, or session from the 30-Day Challenge, and track a user’s progress. We certainly have this on the radar for future development, but now that you know everything about playlists, you can already use the app to keep track of things.
Simply create a playlist, give it a descriptive name (e. g. “My current lesson”), and assign the track you want to come back to in your next session — just remember to update it immediately after your session whenever necessary. You could also add an additional text block, perhaps with a date, to leave helpful comments for next time.
8. Save bookmarks and other playlists
Playlists do not necessarily have to contain audio tracks, they can consist of text blocks only (the play button won’t do anything in such a case — the Allie Spaces playlist is a case in point). This could be useful for storing notes, links to sessions shared by a buddy that you don’t need to edit or want to keep separate from your own editable sessions under “My Playlists”, or links to audio outside of the app, maybe a YouTube video.
However, you need at least one track in the list first to be able to create a text block — you can remove the audio track(s) later, keeping only the text block(s).
If you open and then immediately leave the session builder, an empty playlist (with a placeholder image showing a musical note) is created that can be filled out later.
9. Manage playlists
At this point, the app does not allow you to organise your playlists in personal sub-folders, unfortunately. If you have a need for a lot of playlists, make sure to give them descriptive titles (and helpful images) so that you can find them easily in your list. Choose titles that are good for (alphanumerical) sorting (see below). Also make sure to only keep relevant playlists.
Sort paylists
The underlined word indicates the active sort order:
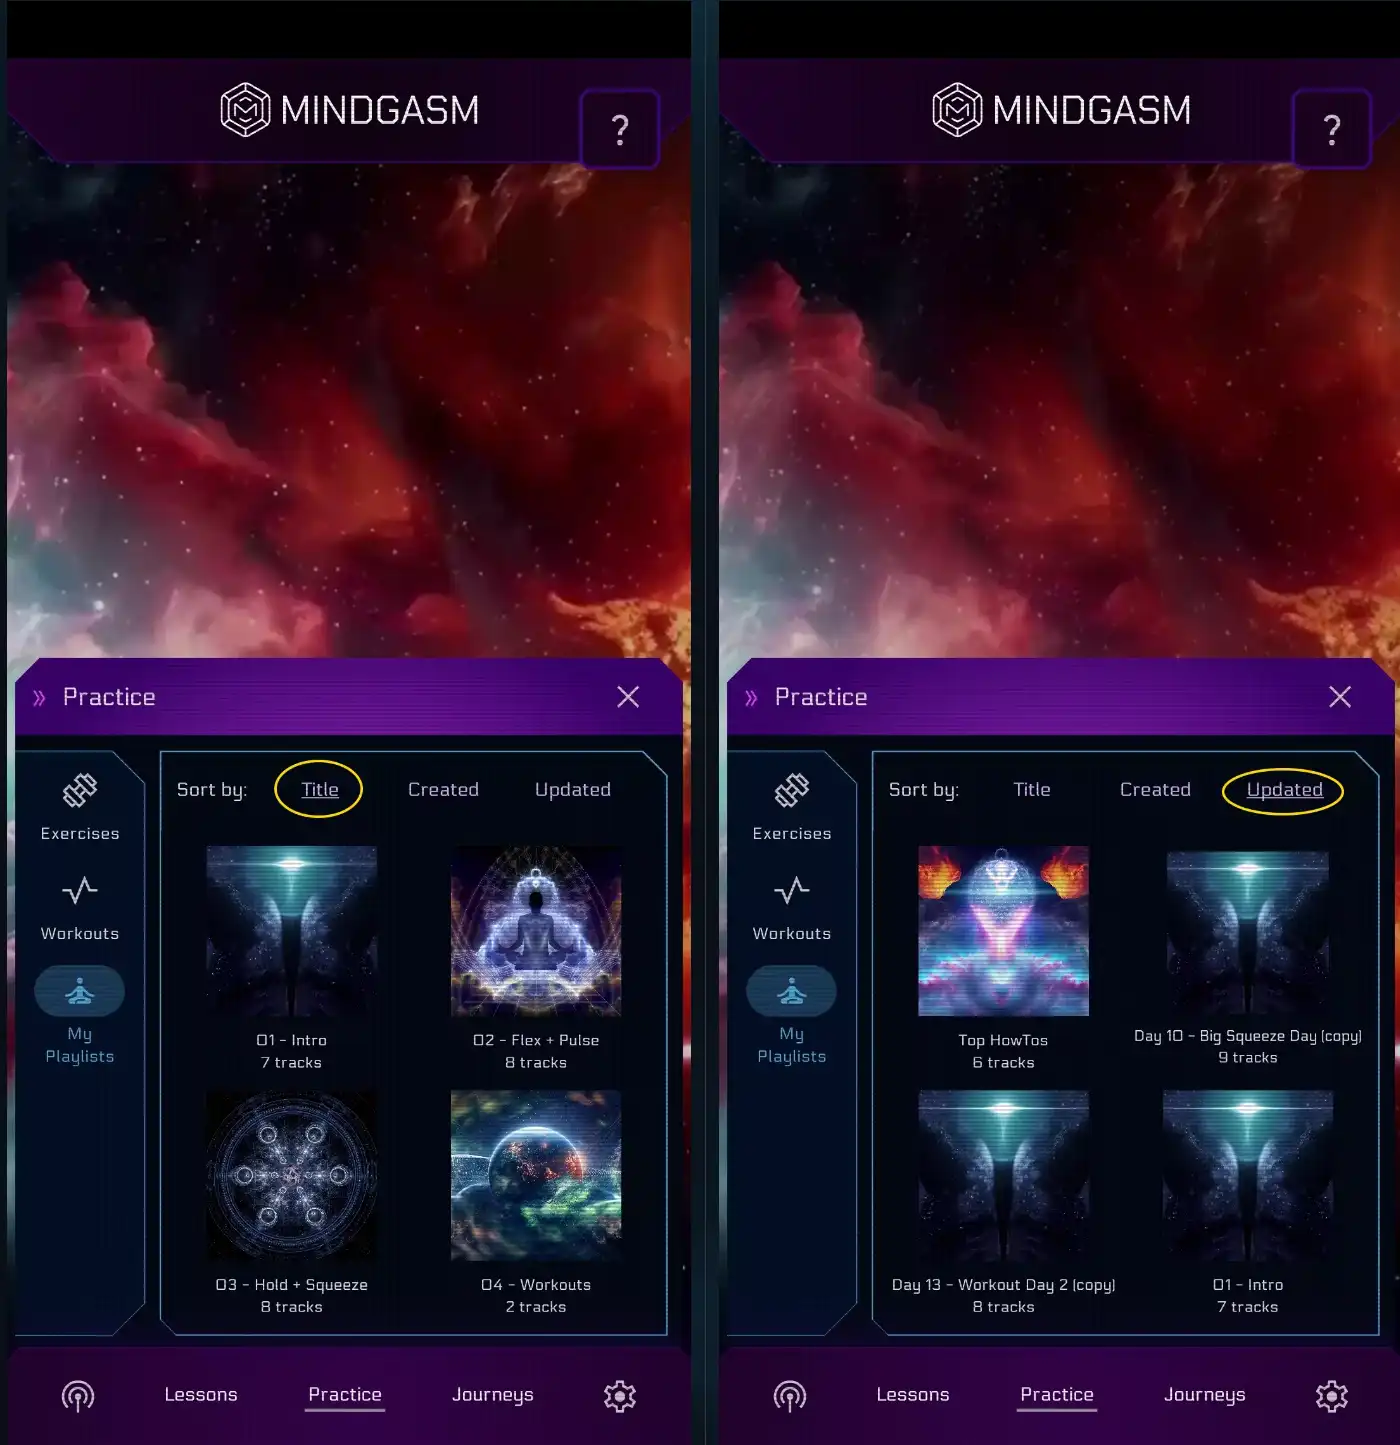
➡️ Sorting with descending order is currently not supported. If you’re looking for the most recently changed playlist, you will have to use the Sort by Updated and scroll to the bottom of the list!
Choosing a different sort order will not reset your scroll position, which is good. So once you are the end of the list, you could easily switch from most recently updated to most recently created, for example, which may or may not yield a different order. You can always tell if you are at the bottom when you can see the “Create new Session” button — it will always be the very last entry in your list, regardless of the sort order, or the only entry if you haven’t added a playlist yet.
➡️ The sort order is not saved, so after the next app start, the list will be displayed with the default order in any case.
This concludes our presentation of the session builder. It’s a powerful tool — we do hope you will make plenty use of it to enhance your Mindgasm practice with playlists tailored to your needs! Come back here to look up details, and/or check out our special Session builder Tutorial Video.